本帖最后由 bubblegum 于 2015-11-30 07:21 编辑
Modelsim is a program created by Mentor Graphics used for simulating your VHDL and Verilog designs. It is the most widely use simulation program in business and education. This tutorial explains first why simulation is important, then shows how you can acquire Modelsim Student Edition for free for your personal use. Simulation is a critical step of designing FPGAs and ASICs. Simulation allows the designer to stimulate his or her design and see how the code that they wrote reacts to the stimulus. A great simulation will exercise all possible states of the design to ensure that all input scenarios will be handled appropriately. Did you forget an if statement somewhere? Did you remember to give every possible case statement assignment? These are the types of errors that are very easy to make when you do not simulate your design. Let's get started. Do you have Modelsim downloaded and installed on your computer? Get it here. Perform the installation with the default parameters. Note that you will need to request a license from Mentor Graphics. At the end of the installation you must select Finish and a browser window will open with the License Request form. Clicking on an existing license request link from your browser bookmark or from a link posted on the web will not work. The code that we will be simulating is the VHDL design below. The actual code is not important, so if you are learning Verilog that's OK! You don't need to know VHDL for this tutorial. The VHDL code creates a simple And Gate and provides some inputs to it via a test bench. Download the source code for the files and_gate.vhd and the testbench and_gate_tb.vhd and save it somewhere.
and_gate.vhd:
-------------------------------------------------------------------------------
-- File Downloaded from [color=rgb(135, 138, 133) !important][size=1em]http://www.nandland.com
-------------------------------------------------------------------------------
library ieee;
use ieee.std_logic_1164.all;
entity and_gate is
port (
input_1 : in std_logic;
input_2 : in std_logic;
and_result : out std_logic
);
end and_gate;
architecture rtl of and_gate is
signal and_gate : std_logic;
begin
and_gate <= input_1 and input_2;
and_result <= and_gate;
end rtl;
| | | | and_gate_tb.vhd: | | ------------------------------------------------------------------------------- | -- File Downloaded from [color=rgb(135, 138, 133) !important]
http://www.nandland.com | | ------------------------------------------------------------------------------- | | library ieee; | | use ieee.std_logic_1164.all; | | | entity and_gate_tb is | | end and_gate_tb; | | | architecture behave of and_gate_tb is | | signal r_SIG1 : std_logic := '0'; | | signal r_SIG2 : std_logic := '0'; | | signal w_RESULT : std_logic; | | | component and_gate is | | port ( | | input_1 : in std_logic; | | input_2 : in std_logic; | | and_result : out std_logic); | | end component and_gate; | | | begin | | | and_gate_INST : and_gate | | port map ( | | input_1 => r_SIG1, | | input_2 => r_SIG2, | | and_result => w_RESULT | | ); | | | process is | | begin | | r_SIG1 <= '0'; | | r_SIG2 <= '0'; | | wait for 10 ns; | | r_SIG1 <= '0'; | | r_SIG2 <= '1'; | | wait for 10 ns; | | r_SIG1 <= '1'; | | r_SIG2 <= '0'; | | wait for 10 ns; | | r_SIG1 <= '1'; | | r_SIG2 <= '1'; | | wait for 10 ns; | | end process; | | | end behave; |
|
Let's open Modelsim. You are greeted with a window that looks like this 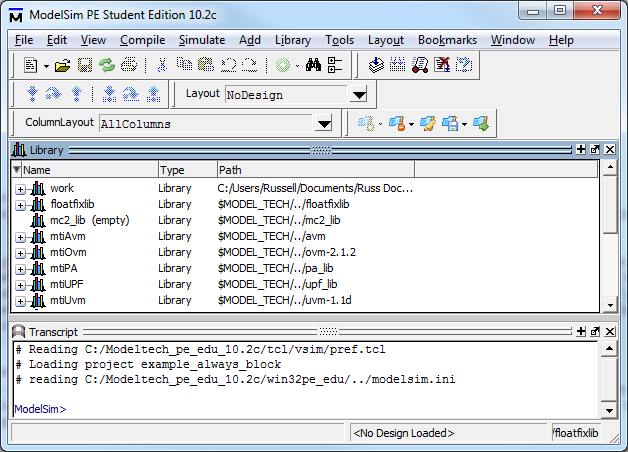 Modelsim Main Window
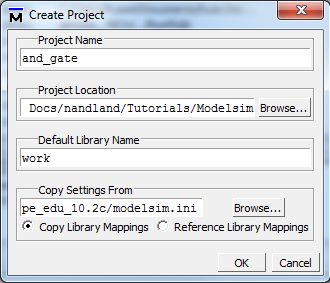 In order to run your simulation, you need to create a project. Click File -> New -> Project. You will see the window presented on the left. Choose a location for your new project and give it the name and_gate. Projects in Modelsim have the file extension .prj. Leave the other settings to their default. This just says that all code will be compiled into the library "work". In order to run your simulation, you need to create a project. Click File -> New -> Project. You will see the window presented on the left. Choose a location for your new project and give it the name and_gate. Projects in Modelsim have the file extension .prj. Leave the other settings to their default. This just says that all code will be compiled into the library "work".
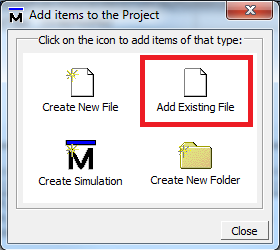 Click on Add Existing File as shown in the picture to the right. Navigate to the location where you downloaded and_gate.vhd and and_gate_tb.vhd and add both of those to your project. Keep other settings at their default. Click OK when done. Click on Add Existing File as shown in the picture to the right. Navigate to the location where you downloaded and_gate.vhd and and_gate_tb.vhd and add both of those to your project. Keep other settings at their default. Click OK when done.
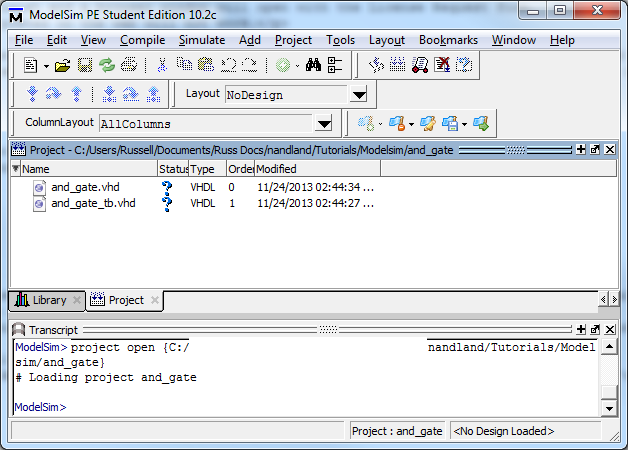 Modelsim Project Window - Files Added to Project
Notice now that the files have been added successfully to your project. See those two blue question marks in the Modelsim Project Window Figure above? That means that Modelsim has not compiled the files yet. You will need to compile the source files. To do this, right click on and_gate.vhd, click on Compile, then click on Compile All. You should see messages in the Console window appear in green that the compile was successful as shown in the screenshot below.  Results of a Successful Compile
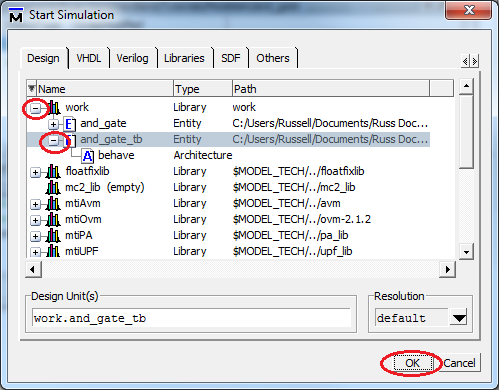 To start your simulation, click on Simulate in the Menu Bar, then click Start Simulation. This opens the Start Simulation Window. Click on the plus sign next to work, then click on the plus sign next to and_gate_tb. Make sure you select and_gate_tb and not and_gate as we want to simulate the design at the test bench level. Once and_gate_tb is highlighted, click OK. To start your simulation, click on Simulate in the Menu Bar, then click Start Simulation. This opens the Start Simulation Window. Click on the plus sign next to work, then click on the plus sign next to and_gate_tb. Make sure you select and_gate_tb and not and_gate as we want to simulate the design at the test bench level. Once and_gate_tb is highlighted, click OK.
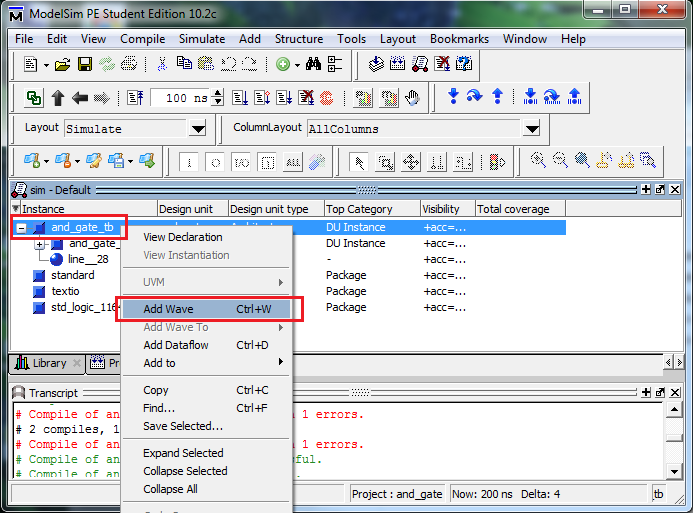 Modelsim Simulation Window - Simulation Ready
Almost there! The simulation is ready and waiting. Now, the majority of the time that you use Modelsim will be spent looking at the waveform view. The waveform view contains waves (binary 0's and 1's, hexadecimal digits, binary digits, enumerated types, etc) for all of the signals in your design. It shows how your module reacts to different stimulus. The next figure shows you what your waveform view looks like, but first you need to add some signals to monitor. In this example, we will monitor all of the signals in the test bench. To do this, right click on and_gate_tb in the sim window and click Add Wave. You can also click and drag signals to the waveform window from other windows in Modelsim. 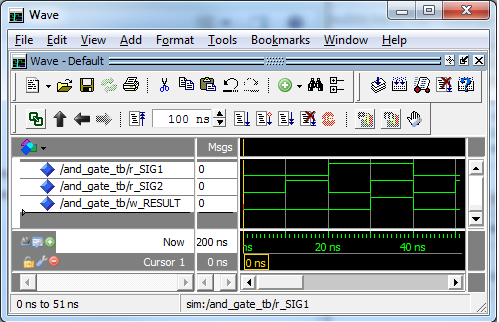 Here is your waveform window. All of the test bench signals have been added as signals your can monitor. To run the simulation, click the Icon with a little piece of paper and a down arrow next to the 100 ns time. This will run your simulation for 100 nanoseconds. Watch how the signals change! Congratulations! You've created your first Modelsim simulation! Here is your waveform window. All of the test bench signals have been added as signals your can monitor. To run the simulation, click the Icon with a little piece of paper and a down arrow next to the 100 ns time. This will run your simulation for 100 nanoseconds. Watch how the signals change! Congratulations! You've created your first Modelsim simulation!
This tutorial showed you how to create your own project in Modelsim, add files to your project, compile your source files, start your simulation, and view your waveforms. You're ready to explore all of the examples on this web page and run the simulations for yourself. Use the sidebar at the top of the page for navigation.
|  AMD-FPGA
5503 人阅读
|
0 人回复
 AMD-FPGA
5503 人阅读
|
0 人回复
 微信客服01
 QQ售前
QQ售前
